

.png)
.png)
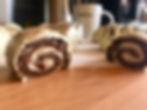
VERY MOREISH CAPPUCCINO MINI ROLLS
- Faye Caramela de Goma
- May 29, 2020
- 8 min read

Looking for a slightly more technical baking challenge to take on this weekend? Well - I challenge you to a Cappuccino Mini Roll!
These cute little rolls of coffee goodness certainly involve a little more effort than your average cookie or brownie recipe, but overall, are really not too difficult to make if you follow the recipe correctly, and I promise you that little extra effort is so worth it in the end!
After some trial and error (which involved a couple of test batches being 'trialed' to the point where I thought I might throw up from over-scoffing my experiments - I've had to go on 2 runs today to make it up to myself!), I have finally mastered the perfect recipe and method to whip together this version of the classic, much-loved, mini roll which I'm delighted to share with you!
"So, what are these Cappuccino Mini Rolls you speak of?"
Let me sell it to you Marks & Spencer's style - *seductive voice* An exceptionally light and fluffy coffee-chocolate sponge lovingly embraced by a lusciously creamy coffee buttercream, all enveloped in smooth melted white chocolate - the ultimate, wickedly-indulgent treat! If that hasn't sold it to you, then I don't know what will!
If coffee and white chocolate don't float your boat, you could always go more classic and adapt the recipe for a peppermint, chocolate, or vanilla buttercream with a milk or dark chocolate coating! Just be sure to send me some in the post for quality control! ;)
What's involved?
Although this may look a little tricky, when you break it down, there are only three main stages to mini roll making: 1. Making the sponge, 2. Filling & rolling, and 3. Coating.
1. The sponge


Like you would use in a swiss roll, the sponge we are using for this recipe is what is known as a 'fatless sponge'. Now, don't get your hopes up - this doesn't necessarily mean it's any healthier than a regular sponge, but the term derives from the fact that the sponge, unlike most other sponge recipes, does not contain butter, instead taking its moisture and fat from the eggs, which creates a wonderful light-as-clouds texture! I have added a small amount of vegetable oil to this batter because it helps make the sponge a little more pliable when rolling and also keeps the sponge from drying out too quickly.
This sponge also does not use any raising agents such as baking powder for its light and fluffy texture, but instead relies solely on the volume of air bubbles produced by whisking egg whites to stiff peaks, so make sure you have a hand or stand mixer at the ready, or a very strong forearm if hand whipping!
For this recipe, we use 4 medium eggs (or 3 large), separated, whisking the yolks and sugar together until very pale, thick and creamy. This yolk mixture is combined, in various stages, with some plain flour, cocoa powder, oil, milk, flavouring, and finally the egg whites which have been whisked to stiff peaks.
The batter is then transferred to a lined swiss roll tin, or a standard baking tray with at least 2cm high edges, and baked for approximately 16 minutes.
2. Filling and rolling


For the creamy coffee filling, we use a basic buttercream flavoured with coffee extract** and a splash of milk or cream. Instead of the usual 1:2 ratio for butter and icing sugar, we only use 1.5 x the amount of icing sugar to butter, so as not to over-sweeten and already sweet treat, and also for a more melt-in-the-mouth, creamy texture that blends nicely into the rolled cake layers when you bite into it!
The cake should be completely cooled before spreading the buttercream.
Now time to roll!
You want to very carefully, but tightly, roll your sponge inwards from each short of the sponge, working gently so as not to tear or break the sponge up, until you eventually end up with 2 long rolls that meet each other in the middle. The sponge is then cut down the middle to separate the 2 rolls from each other, and are then each divided into 4 smaller mini rolls, giving you a total of 8! I will walk you through this in more detail in the method. Don't worry - I've got your back!
*NOTE: If you don't have coffee extract to hand, you can make your own by dissolving 1tbsp of instant coffee with 2 tsp of hot water and let cool before using
3. Coating


After a short chilling time, the rolls are ready to be coated in melted chocolate!
To melt the white chocolate, I find the double-boiling method is the most fool-proof and, although a bit more time consuming, is so much more reliable than melting in a microwave or over direct heat. It ensures a smooth and glossy chocolate and avoids running the risk of overheating the chocolate which can cause a gloopy, thick and uneven consistency.
The chocolate is put into a heat proof bowl and rested over pan of simmering water to gently melt the chocolate. I actually add a tsp of vegetable oil to the chocolate as it melts, which helps keep a smooth consistency and prevents the chocolate thickening up and drying out before you've finished coating. Don't be tempted to add more oil though, as too much fat will mean your chocolate doesn't set as firmly.
The coating bit is actually the trickiest for me and takes some care and concentration. There are different ways to approach coating your sponges including, dipping, spreading and pouring. After a couple of trials, I found that gently spooning the chocolate evenly over the rolls gave the best finish, but you can choose to spread or dip if you prefer!
The rolls are then chilled in the fridge to allow the chocolate to set! If you live in a warm climate, I suggest storing the rolls in an airtight container in the fridge until you want to eat them. Allow them to thaw for about 10-15 minutes so the buttercream softens before devouring!
Cappuccino Mini Rolls
Hands on: 40 minutes
Cooking: 16-18 mins
Chilling: 35 mins
Serves: 8
Difficulty: Medium - requires some skill
Ingredients List:
Sponge:
4 medium eggs (or 3 large), separated
75g caster sugar (divided)
11g flavourless vegetable oil
2 tsp milk
1 tsp coffee extract (see above to make your own)
40g plain flour
10g cocoa powder
Buttercream:
100g unsalted butter, softened
150g icing sugar
1 1/2 tsp coffee extract
2 tsp milk or cream
Chocolate coating:
250g white baking/cooking chocolate
1tsp vegetable oil
Cocoa powder for dusting or melted dark chocolate for drizzling
Method:
Preheat oven to 160C (fan) or 180C (convection) and grease and line a 35x25cm baking tray or swiss roll tin (if using a slightly smaller tin, you will have some batter left over - do not overfill the tin as you don't want a sponge that is too thick to roll)
In a large bowl whisk the egg yolks with 50g of sugar until very pale, thick and creamy. The texture should be at 'ribbon stage', so when the beaters are removed from the bowl, thick ribbons of the mixture stream from the whisk
Add the oil, milk, flavouring and cocoa powder to the egg yolk mixture and beat to combine
Whisk your egg whites at a low speed until soft peaks begin to form. Gradually add the remaining 25g of caster sugar in three stages, beating well in between each addition, until you have glossy, stiff peaks
Add 1/4 of the egg white mixture to the egg yolks, and using a manual whisk or rubber spatula, fold in to loosen the egg yolks. Add another 1/4 of the egg whites and fold in gently so as not to knock out too much air
Sift in the flour in three stages, folding gently after each addition until just combined
Now add the batter to the remaining whisked egg whites and fold until fully incorporated. The batter should be light, and airy
Pour the mixture into the tin and even out with a rubber spatula or pallet knife (it should fill the tin to about about 2cm high when levelled). Tap the tin a couple of time on the counter to remove any large air bubbles and pop any large bubbles that surface with a cake tester or tooth pick
Bake for approximately 16-18 minutes or until the centre is springy to the touch
When cooked through, remove from the oven and place the sponge, still in the tin, on a cooling rack and cover with a slightly damp cloth until completely cooled
Meanwhile, make your buttercream by beating the softened butter until creamy. sift in icing sugar and beat on a low speed until incorporated before increase speed and mixing until light and fluffy. Add the coffee extract and milk and beat for a further minute (if you want a more intense coffee flavour your can add an additional 1/2 tsp and reduce the milk to 1 1/2 tsp.
Once the sponge has cooled, turn out onto a dry tea towel, or baking parchment, lightly dusted in icing sugar and carefully peel and ease off the baking parchment from the sponge, taking care not to tear the cake. At this stage I like to re-flip the sponge back the other way, onto another piece of baking parchment so the smooth underside of the sponge will be outwards-facing when rolled - sometimes the topside of the sponge can be sticky and cause some scarring to the surface of the rolls which show up when the chocolate is poured over. This step is not necessary and can be a little tricky to re-flip, but it tends to result in a smoother finished surface.
Spread the buttercream in a thin, even layer over the sponge
With one of the short ends facing you, make a small incision on each side of the long ends, half way up the sponge so you can see where you need to stop rolling
Begin tightly, but gently, rolling the sponge, starting from one of the shorter ends, towards the middle of the cake. Don't press too hard or you will disperse the buttercream. When you reach the incision you made earlier at the centre of the cake, stop and turn the sponge around to begin rolling from the other end. You should end up with two rolls that meet each other in the middle
Cut the sponge down the middle to separate the 2 rolls and complete each full roll until the seams are sitting underneath the cakes
Cut the ends off each roll with a sharp knife, being careful not to press too hard and squash the cake (you can eat the ends! Yum!)
Proceed to cut each roll into 4 equally-sized mini rolls until you have 8 in total
Chill in the fridge for about 15-20 minutes whilst you prepare the chocolate, in order to help the mini rolls firm up before coating
Cut the chocolate into small chunks and pace in a heatproof bowl with the vegetable oil over a pan of simmering water - the bowl should be resting about 2 inches above the water level. Stir frequently until the chocolate is fully melted and glossy and then remove from the heat
Working quickly, dip the underside of the chilled mini rolls in the chocolate and allow excess to drip off before placing on a wire cooking rack with a tray or tin foil placed underneath to collect the dripping chocolate. Using a large spoon, slowly pour spoonfuls of melted chocolate over each of the rolls, trying to cover all sides and evenly as possible . You may need to spread the ends of the rolls with chocolate to ensure they are fully covered. Decorate with melted dark chocolate drizzled over the top, or a tiny dusting of cocoa powder sifted from a height or flicked on with a small decorating brush.
Using a pallet knife, as gently as you can, place rolls one by one onto a plate or small board lined with baking parchment and chill in the fridge until the chocolate has fully set. Enjoy with a cup of tea or coffee!