

.png)
.png)
Macarons SOS - All you need to know!
- Faye Caramela de Goma
- Jun 5, 2020
- 18 min read
Updated: Feb 11, 2021
Tips, FAQs, Trouble Shooting and Best Practice!

I absolutely adore macarons. Their lightly crispy and chewy, sweet shells that seem to melt in your mouth along with sumptuous fillings that come in every flavour and texture you can imagine, from rich butter creams to fruity preserves, and chocolatey ganaches to velvety creme mousselines. And the colours! So many colours! The customisation options are endless when it comes to these dainty little cookies.
I've spent many an hour trying to perfect my macaron game, with some tears and tantrums, plenty of research online and in books, and a HELL of a lot of trial and error. If you're fond of baking and want to up your macaron game, or just starting out on your macaron journey, I've put this post together combining everything I have learned about macaron-making, to help you along your way and hopefully provide you with all you need to know about making these sweet little treats. Seriously, Macarons are a true science and even have their own terminology (pretentious little things aren't they?!), so make like a sponge and absorb all the info you can before tackling this classic!

Italian Vs French Method
The first thing to decide when starting out, is which meringue method you are going to opt for. Yes - there are options! The most popular methods of macaron making are the French method and the Italian method which vary slightly in their approach to making meringue. I am going to outline both and point out the pros and cons of each method.
French Macarons
This is the method I started out with when I began making macarons, and is likely the method you will be most familiar with. This process of making macarons uses French meringue to structure the macaron shells, which involves whipping up egg whites and gradually incorporating finely granulated sugar (caster sugar) to achieve stiff glossy peaks of meringue. The meringue is then folded in to almond flour, icing sugar to make your macaron batter.
Pros :
This method is much simpler than the Italian method which I will explain shortly
Does not require a stand mixer
Safer to execute if baking with children
Cons:
Requires more care and precision when folding the batter as the meringue is much more delicate
More room for error when folding which, if not careful, can often result in cracked or uneven macaron shells
Italian Macarons
This method, as you may have guessed, uses Italian meringue to structure the macaron batter. This involves whipping egg whites whilst steadily incorporating a cooked sugar syrup at 'soft-ball stage' which results in an extremely silky and glossy meringue with stiff peaks. As with the French method, the meringue is then incorporated with the almond flour, icing sugar and liquid egg whites that have not been whipped.
Pros:
Produces a more sturdy meringue
Easier to incorporate into the other ingredients and less room for error when folding the batter
The cooked macaron holds a stronger meringue-like appearance although still stays soft inside
Cons:
Process of making the meringue is more complex
Requires a stand mixer to whip egg whites at the same time as pouring the sugar syrup
Working with hot sugar syrup makes this process less child-friendly - an adult should always carry out the sugar syrup stages of the process!
My verdict
For me, I pretty much always opt for the Italian method these days. Although it's a little more work and involves some extra washing up, I find the macarons to be generally more fool-proof once you're over the hurdle of making the meringue.
Because the sugar is incorporated in the form of a cooked syrup, it better disperses into the egg whites, and the melted sugar envelopes the air bubbles and holds the meringue together making it smoother and shinier, and more dense than French meringue, which I find makes it much more manageable when incorporating the other ingredients and more resilient when folding. My cooked shells also seem much more smooth and glossy when I use this method and rarely ever crack!
Conversely, French meringue is much more delicate and generally a bit wetter making it much more easy to overwork into a runny batter which does not make for a great macaron - trust me, I've shed many a tear over the finished result of an overworked runny batter :(
Now don't get me wrong - I'm not knocking the French method here! I have made some fab macarons using French meringue, and it is certainly a LOT less hassle with the added perk of not having to pull out my stand mixer! HOWEVER, for a non-professional baker, if you haven't absolutely mastered your French 'macaronage' (official term for folding the batter) technique, you do run the risk of imperfect shells which is always heartbreaking! ALSO nearly every cookery book I own, including a mahoosive French patisserie school cookbook, uses the Italian method, and I'm not going to argue with the professionals...
Making Italian meringue is also a great new skill to have under your belt and will set you up for the likes of Italian meringue buttercream which is just to DIE FOR!
As this is my go-to method, I will mostly be focusing on making macarons from this perspective, but most of the below tips and information will apply to both styles of macaron and I'll point out any differences along the way :)
Equipment
There are a few "must haves" when making macarons in general, and especially for making Italian meringue, and a couple of recommended items too:

Required - Electric weighing scales - As I mentioned before, macarons really are a science, and as such, do require a certain amount of precision. When measuring ingredients, just a few grams difference can affect the consistency of your meringue and batter which will affect the overall look and texture of your baked macarons. For instance, I always measure my egg whites as every egg can vary and one egg can hold much more egg white than another which will drastically effect the meringue. So put away those pesky unreliable cup measures - we're not making muffins here! If you don't have digital scales and you love baking, especially technical bakes, I really recommend buying one. Even a relatively cheap one will do the job and it's so worth it for precise baking!
Recommended - Food processor - If you have a food processor, use this to blitz your almond flour and icing sugar to create an extra-fine powder before sifting. It helps to eliminate any unwanted almond lumps!
Required - Sieve - This is essential for eliminating any lumps when making your sugar-almond mixture. Sifting together almond flour and icing sugar will avoid any unattractive lumps or bumpy surfaces on your cooked shells.
Required - Electric mixer or stand mixer - A stand mixer is massively useful for the Italian method, as it means you can pour in your sugar syrup carefully and steadily whilst the egg whites are whipping. If you don't have a stand mixer, you can use and electric hand mixer but take extra care as it will be quite a handful to manage. Use a heavy bowl on a non-slip surface (perhaps a tea-towel) so your bowl remains still whilst you use one hand to whisk and the other to steadily pour the syrup. If opting for the French method, an electric hand mixer or stand mixer are both fine for whipping up your eggs whites and sugar.
Recommended - Thermometer - This is important and highly recommended for the Italian method where the sugar syrup should not exceed 115C. We want the sugar to be at soft ball stage which begin at 110C and ends at 115C before become hard ball stage. You can, however, test your sugar without a thermometer by placing a small amount of the syrup into cold water and quickly testing the texture of the sugar with your fingers (more on this later). A thermometer is not required for the French method.
Required - Piping bag - This is a must for macaron making. Disposable plastic ones are easy to come by in most supermarkets, but if you can find a resuable fabric bag then saving the planet is always a bonus! Regular plain piping nozzles should be used for piping the macarons, but if you do happen to have disposable plastic piping bags, you can snip a small amount off the end and use this to directly pipe although it's not quite as precise. Do not be tempted to use a large round nozzle as it makes it much harder to control the flow of batter when piping - more on this later!
Required - Silicone/Rubber Spatula - This is imperative for folding the meringue into the almond mixture without damaging the egg whites. A wooden spoon will not have the same precision or effect as a rubber spatula. The next best thing would be a large metal spoon, but the spatula really is a must and is great for all baking where folding is involved!
Required - Baking Trays - You will need baking trays lined with baking paper or a silicone mat for baking the macaron shells. They should be heavy trays and as flat as possible (some trays become slightly risen in the middle over time).
Recommended - Macaron mat or template - You can freely pipe your macarons, but using a macaron mat or template will help you pipe so that all of your shells are uniform. You can make your own template by drawing your circles with a pencil on baking paper which you can then flip over before piping, although a macaron mat with a pre-marked template will help save time if you make macarons often (I'm still meaning to buy one myself!)
The Dry Ingredients


The dry ingredients for a macaron are very simple: Ground almond flour and icing (confectioners) sugar. These are combined to make, what is technically known as, the taunt pout tant. These ingredients are generally measured in equal quantities in any given macaron recipe. For example in the recipe we will see below, we use 100g of icing sugar and 100g almond flour.
To make the taunt pour taunt, we process the almond flour and icing sugar together in a food processor, being careful not to whizz too much and overheat the sugar. This processed mixture is then sifted together to ensure we eliminate any unwanted lumps which will effect the smoothness of the baked macaron shells. If you do not have a food processor, you can simply sift the almond and sugar, however you will find you will have more lumps that need to be discarded so processing the mixture is recommended.
Making Italian Meringue

To make Italian meringue, we place our caster sugar and water in a small saucepan and, without stirring, bring to the boil. Meanwhile, start whipping the egg whites on a medium low speed. When the sugar mixture begins to bubble, check the temperature with a thermometer. Once at 105C, increase the mixing speed of your egg whites to high in order to form soft peaks. Once at 113C, remove the sugar syrup from the heat and, with the egg whites still whipping on high speed, slowly pour the syrup into the egg whites in a thin, steady stream down the side of the bowl - do not incorporate all at once unless you want some lovely scrambled egg whites! There will be a hardened stream of sugar down the side of the bowl as it cools, but this is normal, do not try to incorporate it. just let it sit there and do its thing!
Continue to whip the meringue on high speed for about 10 minutes to allow the mixture to cool and develop into stiff glossy beautiful peaks.


What if I don't have a sugar thermometer?
I do really recommend investing in a thermometer for absolute precision - there will be less chance of things going wrong and having to start your syrup again! However, you can test your sugar manually by dropping a small amount of the syrup into a bowl of cool water. The syrup should set quickly into a soft, malleable ball - test with your finger to check its consistency. If the sugar syrup dissolves straight into the water, the sugar isn't ready, if the syrup turns hard rather than soft, the sugar has been over cooked.
Macaronage

The macaronage is the technical term for the process of working the batter and incorporating the taunt pour taunt and liquid egg whites with the meringue. There are two ways of doing this - both ways have worked for me.
The first option is to mix your taunt pour taunt with the liquid egg whites to make an almond paste. At this stage you should also mix in your food colouring and any flavouring (powdered colouring or gel colouring should be used rather than liquid). About 1/3 of the meringue is then folded into this almond paste to help loosen the mixture before folding in the remaining egg whites.
The second option is to fold your taunt pour taunt directly into the meringue is two stages, and then fold in the liquid egg whites (which should be mixed with the colouirng/flavouring).
Use a rubber or silicone spatula to fold the batter, using a regular motion, working from the bottom towards the top of the batter, and from the sides towards the centre. Unlike a souffle or fatless sponge recipe where we want to retain the foam like mixture, for macarons, we want to gently break the meringue down to create a smooth and gently flowing mixture that is uniform in colour and texture with no streaks of white. Thick ribbons should fall from the spatula when lifted and, as the ribbons fall back into the mixture, you should be able to see their set outline for about 30 seconds before if falls back into the mixture. You do not want to over-mix the batter or you will create a mixture that is too runny and the resulting macarons will be flat and not have "feet" which are the slightly ruffled edges at the bottom of the shell.
Piping

This bit is the trickiest for me and takes a little practice if you aren't accustomed to piping.
Snip off the corner of your piping bag and insert your nozzle. I recommend using a relatively small nozzle as it helps to control the flow of the batter, about 8mm wide if the best! I like to fold down some of the bag inside the nozzle to create a 'stopper' which prevents the batter falling out the nozzel as you are trying to fill the bag - seriously, we are making enough mess as it is without batter dripping all over the place! I also place my bag in a tall container and fold the ends of the bag over the edges to hold the bag steady whilst I fill the bag! Only fill the bag about half way or the bag will be difficult to manipulate, we can refill when needed.

Make sure you baking paper or mat is settled nice and flat to your baking tray before piping. If using baking paper, I like to use a bit of the mixture to help glue the baking paper to the tray and avoid the paper flapping about in my fan assisted oven and potentially damaging my shells. Once your baking sheet is ready, it's time to pipe! This is where a template comes in handy! This can either be drawn onto the back of some baking parchment (do this in advance of making your batter), or you can buy templates silicone mats to help make sure all of your shells are uniform in size.
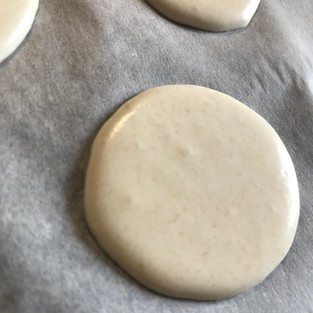
To pipe evenly, pull on your nozzle to release the folded down bag acting as the "stopper" inside the nozzle, and, keeping the bag completely vertical to the baking tray, apply some pressure to the piping bag and allow the mixture to compress itself into a small circle. Fill each template circle about 2/3 full, release the pressure on the bag and sharply lift the nozzle with a small twisting motion to stop the flow of batter - the batter will be be just thin enough to fill out the remainder of the circle as the mixture settles.
Try to space out your macaron shells and stagger them across the tray. This will prevent them leaking into each other if you accidentally pipe too much batter into each circle. Once you have piped all of your shells sharply tap the trap a couple of time on the counter to encourage any large air bubbles to surface and burst. This will avoid your shells developing an 'acne' on their surface when baking and can also help prevent cracking.


Drying Time

This process is technically known as the Croutage. This stage is highly important as it allows the shells the develop a thin, dry skin on the surface which, when baking, becomes slightly crisp and provides a resilience which allows the shells to rise with the moisture in the batter without cracking the surface. It also helps to ensure that your shells form "feet" at their base.
Drying time can vary dependent on the size of your shells and the humidity of the environment you are working in. I reccomeend between 20-30 mintutes, but you can test your shells by very lightly brushing the top of a shell with a finger - the batter shouldnt stick to your finger. You should also see that the shells look more matte in appearance, and not as shiny and glossy as when you first piped them.
After your shells have sufficiently dried, you're ready to bake!
Baking


Ensure your oven is preheated to 150C before putting the shells in to bake. Temperature is important when baking macarons - if the temperature is too high, the shells will rise too quickly causing cracks. Each oven varies and you really need to know how your oven works - some ovens run higher in temperature despite what you've set your dial to. I have an oven thermometer which tells me the true temperature of my oven which has been a life saver in all of my baking!
Once at 150C, put your macarons in to bake for about 14-15 minutes. After about 5 minutes, you should see that your shells have risen and small "feet" have formed. About half way through baking, slowly open the oven and turn your baking tray around to ensure even cooking and avoid browning .
Be careful when baking pale-coloured shells. these do have a tendency to brown slightly. Keep an eye on your shells and do not hesitate to open the oven door slightly to reduce temperature by a few degrees if your shells look like they are browning - you may need to bake for a minute or so extra if you bring the temperature down during baking.
Test if you macarons are done by wiggle the top of one of your shells back and forth. If the shell is "wiggly" on its feet they need more time in the oven - bake for a further few minutes at 2 minute intervals. Perfectly cooked macarons will be just a little wiggly- but overall firm
Once shells have cooked, remove from the oven and place on a counter top dampened with cold water. This helps to create a thermal shock which will make it easier to remove the shells for the baking paper later. Allow to cool completely before trying to remove the shells. Some shells may be slightly tacky underneath so take care when peeling from the baking paper.
Filling

There are so many different filling options for macarons, including buttercream, jams and preserves, ganaches, creme mousselines and jellies. You want a filling that can hold its shape and that doesn't run out of the sides of the macaron when the top shell is sandwiched on top. I tend to opt for butter creams, ganaches and preserves which are the easiest, but you can be as adventurous as you like.
The ideal ratio for the filling of a macaron is 2:1, meaning the filling should be as thick as one of your macaron shells.
For prettier, more uniform macarons, I recommend piping your filling onto the shells, but you can also spread the filling.
Here are some filling ideas for classic macarons:
Plain macarons - Almond buttercream
Vanilla macarons - vanilla buttercream, vanilla creme mousseline
Pistachio - Pistachio buttercream, pistachio white chocolate ganache
Chocolate - Chocolate buttercream, chocolate ganache
Coffee - Coffee buttercream, coffee jelly
Strawberry - Strawberry preserve or jam, strawberry chocolate ganache, strawberry buttercream
Raspberry - raspberry preserve or jam, raspberry white chocolate ganache, vanilla buttercream with raspberry jam
Lemon - lemon curd, lemon buttercream, lemon white chocolate ganache
You can also make great flavour combinations by adding two types of filling or flavoring your shells differently to your filling!
Flavour combinations:
Coffee and chocolate
Vanilla and raspberry
Raspberry and rose
Pistachio and rose
Pecan and maple
Lemon and blueberry
Raspberry and coconut
Maturing
Macarons benefit from a few hours in the fridge in order to help them "mature". This helps get the most of the flavour and texture of your macarons and allows the flavours to develope and the fillings to combine properly with the shells. Allow the macarons to thaw for a few minutes out of the fridge before consuming.
Macarons can be stored in the fridge in an air tight container for 2-3 days after being made
FAQs
Why are my shells flat?
Flat shells that do not have any "feet' usually occur as a result of over working the batter during the macaronage stage. Over working the batter causes the egg white in the meringue to break up and means they won't rise properly. After a proper macaronage, the batter should be smooth, uniform in colour and texture, and should be gently flowing so that thick ribbons fall from the spatula when lifted. See "macaronage" section above for more information.
If your shells do have feet but come out relatively flat, or hollow, and you are sure you are not over working your batter, it may be that you have not whipped your meringue into stiff enough peaks. When you lift your whisk from the meringue, it should stick to the thick in a thick glossy clump.
Why are my shells not smooth?
Cracked
There are a few reasons that shells can crack during baking time.
Crinkled cracks over the entire surface of the macaron tend to indicate that the shells haven't dried out for long enough before being put in the oven. I usually recommend between 20-30 minutes, but if you are working in humid conditions, you made need longer. See "drying time" section above for more information.
It could also be due to the temperature being to high in the oven causing the shells to rise too quickly and crack as a result.
Another culprit for cracking is not working the batter enough during the macaronage stage. If the meringue hasn't broken down enough, the batter will be too foamy and aerated which cases the shells to cook more like a cake or souffle.
Acne
Rough bumps and bubbles usually occur as a result of too many air bubbles being present in the shells before baking. This can be sure to not tapping the trays on the counter tops to release trapped bubbles, but can also be cause by underworking the batter during the macaronage stage meaning the meringue hasn't been broken down enough. Bumpy shells can also be a result of not properly processing the taunt pour taunt or sifting the almond mixture thoroughly.
Why are my shells odd shapes?
This could be due to uneven piping. This does take some practice to get right. It may also be that your trays are not flat enough and may be slightly curved, causing the mixture to spread unevenly when piped.
Why are my shells browned?
Take care when working with pale coloured shells as they can brown easily in the oven. Keep an eye on your shells as they cook and, if you see them starting to brown, reduce the temperature of the oven and increase cooking time by a couple of minutes.
Why are my shells sticking to the baking paper?
It may be that your shells are not cooked through properly. Test if you macarons are done by wiggle the top of one of your shells back and forth. If the shell is "wiggly" on its feet they need more time in the oven - bake for a further few minutes at 2 minute intervals. Perfectly cooked macarons will be just a little wiggly- but overall firm.
They will also stick if you attempt to move them from the baking paper too quickly and you will lose some of your shell to the paper!
Don't forget to slide the baking paper on a cool dampened work top to create a thermal shock!
Tip!
My main tip is to have everything ready and prepared before you begin making your macrons. Measure out ingredients and have all of your equipment ready to hand. If doing a template by hand, make sure it is drawn out before you start your macaron making process!
I also advise avoiding plastic bowls where possible, especially for the macaronage and the whipping of the egg whites. Use a thick stainless steel bowl or pyrex glass bowl if possible.
Macaron Shell Method
(makes approximately 28 shells and 14 complete macarons)
Ingredients:
100g ground almonds
100g icing sugar
80g egg whites (divided 40g + 40g)
100g caster sugar
30ml water
Powdered/gel food colouring (optional)
Flavouring (optional)
Process your almond flour and icing sugar in a food processor being careful not not overheat the sugar, and then sift this mixture together into a bowl to create the taunt pour taunt. Set aside.
In a small saucepan, bring the caster sugar and water to a boil without stirring, and meanwhile whip 40g of your egg whites at a medium low speed
When the sugar begins to bubble, check the temperature with a thermometer. Once the syrup reaches 105C, increase the whipping speed of your egg whites to high speed until you have soft peaks. Do not let the sugar syrup surpass 115C. I like to remove my syrup from the heat at 113C. Refer to the Meringue section above to learn how to test your sugar without a thermometer.
With the egg whites still whipping on a high speed, slowly pour your sugar syrup down the side of the bowl into the beating egg whites in a steady, thin stream. This must be done immediately, as soon as the sugar syrup is ready.
Once the syrup has been poured in, continue to whip your meringue on high speed for about 10 minutes to allow the mixture to cool and ensure you have stiff glossy peaks
Whilst the meringue is whipping, combine your taunt pour taunt with the 40g of un-whipped egg whites, any flavouring, and food colouring. Mix to form a thick paste. (Alternatively, if you choose to combine the taunt pour taunt directly into meringue mixture, use this free time to lightly beat the liquid egg whites, colouring and flavouring with a fork to fully incorporate the colour and flavour. Do not whisk)
When the meringue is done, and you have stiff, silky, glossy peaks of meringue that stick the the whisk in a marshmallowy clump, transfer the meringue to a clean bowl, avoiding any hardened sugar stuck to the sides of your meringue bowl - you do not want hard sugar globules in your shells!
Using a rubber spatula, transfer about 1/3 of your meringue into the almond and egg white paste and fold to loosen the mixture, then transfer this mixture back into your remaining meringue and fold, working the batter carefully as detailed in the Macaronage section above (alternatively fold the taunt pour taunt directly into the meringue in 2 stages, then add your liquid egg whites and fold into the batter). The resulting batter should be gently flowing, uniform in colour and texture with no white streaks, and should fall in thick ribbons from the spatula. Do not overwork the batter or it will become too runny.
Attach your baking paper to a tray by putting a small dot of the batter in each corner, this will act as a glue and make sure your paper does not flap about in the oven.
Fill your piping bag with the nozzle attached and pipe out your small round circles following the template. See the Piping section above for tips on how to do this.
Once your shells have been piped, tap the tray harshly on the counter a couple of times to release any unwanted, trapped air bubbles and set aside to dry for about 20-30 minutes, or until the shells look matte in appearance and the batter does not stick to your finger when you lightly touch the surface of one of the shells.
Preheat the oven to 150C, making sure the oven is at the correct temperature before putting your shells in.
Bake for 14-15 minutes, turning the tray half way through the baking time for even cooking
14. When the shells have cooked, remove from the oven and place the baking paper directly onto a cool, dampened worktop to provide a thermal shock to the bottom of the shells. Allow to cool completely before attempting to remove from the baking paper.
Fill with your choice of fillings and chill in an air tight container for a few hours or overnight to mature.
Macarons should be consumed within 2-3 days.


Comments